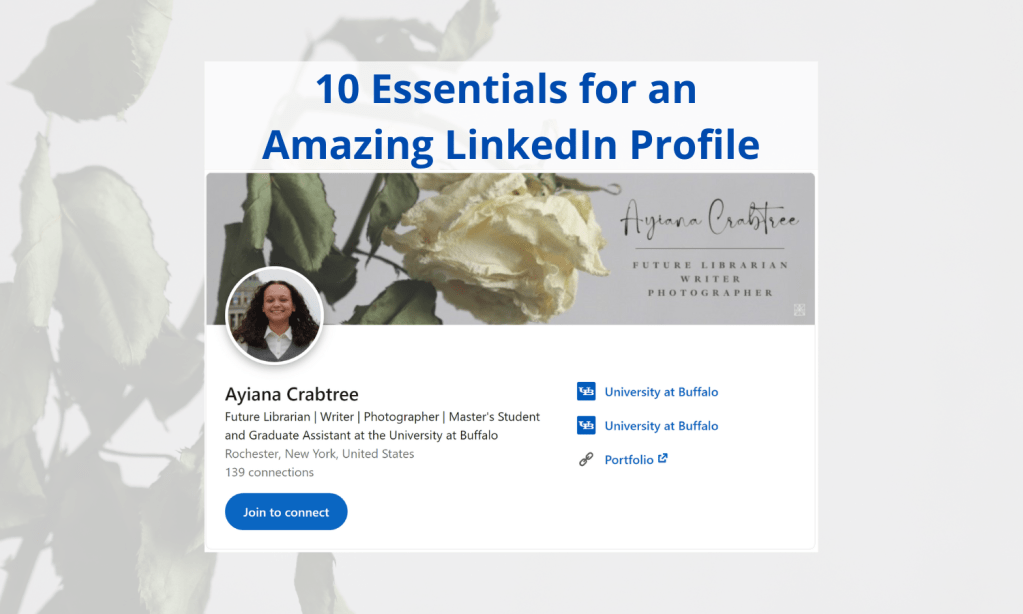
I created my LinkedIn profile during my last semester of undergraduate at the recommendation of a mentor. She told me that it was an excellent way to create professional connections, especially if I was interested in the Librarianship profession. At that point, I wasn’t really using the platform much, and I didn’t do much beyond making sure I kept my information up to date. Now, however, after having the platform for a bit longer (6 months at this point), I am beginning to see the benefits that this platform has to offer. I have spent quite a lot of time looking at accounts that tell you “here’s the best thing to do to make your LinkedIn profile great,” so this is a compilation of the facts I found the most useful, summarized in my own way (plus some hopefully helpful graphics!)
1: Profile Visibility
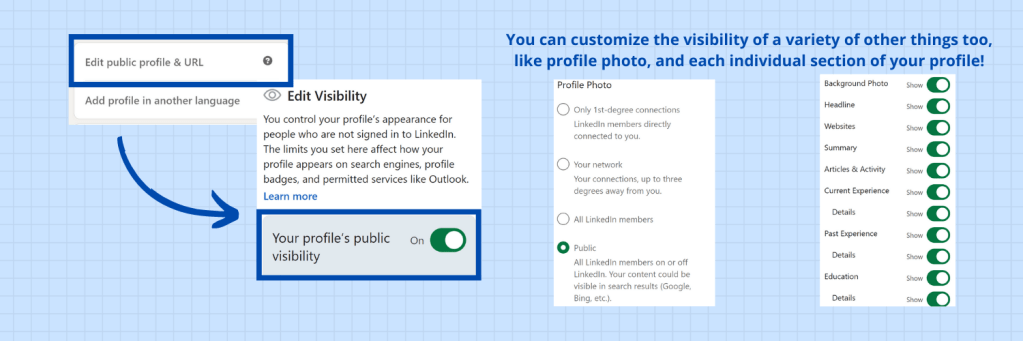
Now, this was something I was unsure about for a while, as I always keep my other social media accounts private to avoid bots and scam accounts. However, LinkedIn doesn’t really have those (with the exception of advertised jobs that are sent out to everyone that fits their hiring criteria), so I feel comfortable having my profile public. This was an important decision and one that I recommend you make if you are looking for a job or even just trying to get your name out there.
Not only does this allow your profile to pop up in people’s searches more often, but this also means that when one of your connections reacts to one of your posts, their connections will get to see that on their timeline as well, getting your content more visibility. If you are looking to grow your network, having your profile public is the way to go.
To access this setting, click “Edit public profile & URL” on the upper right-hand corner of the screen while on your profile page. Then, the option to select visibility should appear on the right-hand side!
2: Custom Profile URL
Having a custom profile URL may not stand out to the average user, but if you are sharing your profile a lot, having your name in the URL will make it stand out more!
To access this setting, click “Edit public profile and URL” again, and the option should be at the top of the right-hand side of the screen. Click the edit pencil, and start typing your custom URL!

3: Profile Photo
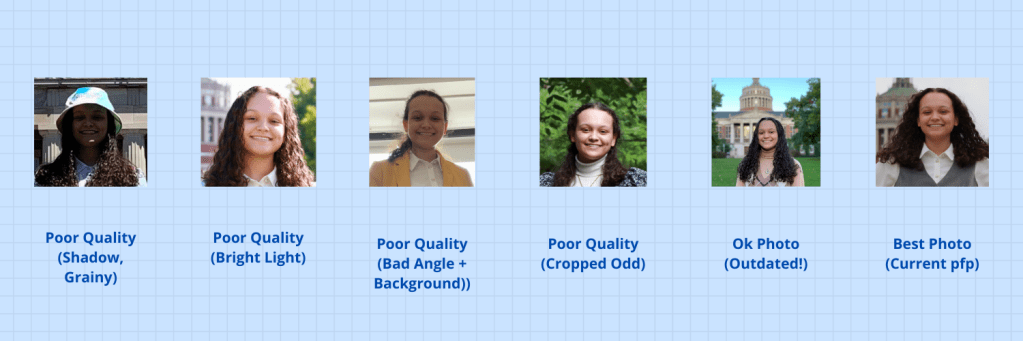
Your profile photo is likely to be the first thing people look at when they view your LinkedIn page, so you want to ensure it’s the best it can be! There are a few things to keep in mind when choosing a profile photo: quality, angle, outfit, and background.
The quality of the photo is important to keep in mind, as you don’t want the image you choose to be grainy and hard to see. If people don’t know who they’re looking at, why would they want to click on your profile? Most smartphones can take a decent-quality photo, but if you have a DSLR and a tripod, try taking one with that! Lighting is also important when considering quality, as harsh shadows can make a photo look funky or draw attention away from your face. To make the lighting best, try to take the photo on a cloudy day, or at least under full shade.
The angle at which the photo was taken will make you look more or less professional. It makes the most sense to have the photo taken head-on, or perhaps just slightly below your line of sight. Any angles that are more drastic where you would need to tilt your head up or down to look into the camera are not ideal.
Your outfit on photo day will also help to shape the image people form of you in their minds. Make sure what you wear is professional but also represents you. When you add the photo to your profile, you may not see most of your outfit, as you want the photo to focus on your face, but little bits of it will likely be visible from the chest up. You may also choose to accessorize with earrings, a necklace, a headband, or other accessories to show your personality if that’s your style.
The background of the photo is another thing that might not be super visible, but still an important consideration for your photo. You will want to stick with one of two extremes: either a super vibrant solid-colored background or a more neutral background. I prefer a more neutral background, as that matches with the “brand” I’ve put together for myself. You can also consider trying to incorporate something important to you in the background, which for me, was Rush Rhees Library!
An additional photo tip: Make sure you crop the photo correctly when applying it to your profile! You may initially think that having your face centered makes more sense, but this actually throws the image off a lot, so try to have your head a little more towards the top of the circle boundary–this also lets you show off your outfit a bit more. You should also try to update your profile photo once a year.
4: Banner
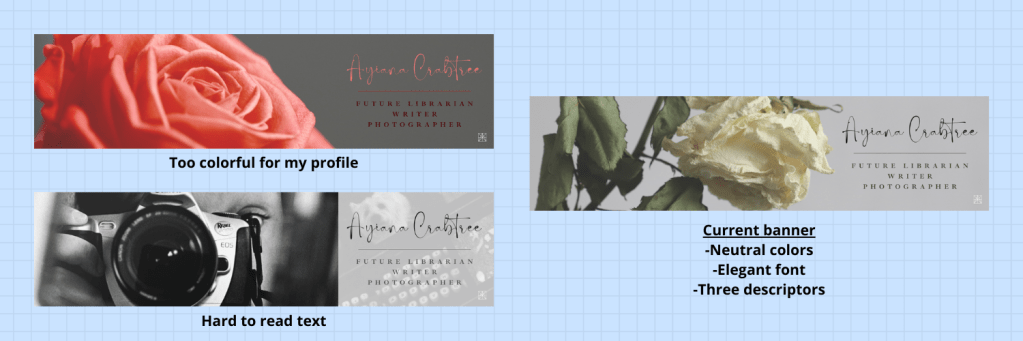
A lot of people don’t take advantage of their LinkedIn banners, and it’s a real shame! Not only does it provide an opportunity to show off a cool photo you took or your graphic design skills, but it also is a blank slate for you to highlight more information about yourself. When creating a banner for your profile, there are two main things to keep in mind: photo/background choice and what you want to showcase. I use Canva for all of my graphic design, as it’s a free-to-use website (and mobile application) that has a wide variety of options that will be sure to fit your needs. They have tons of pre-set canvas sizes, including the LinkedIn banner, which is 1584 x 396 px.
The photo or background choice is yet another opportunity to show people your artistic side (if you have one) or at least to show people what your favorite color is. You want something that’s going to complement your profile photo, so for me, that meant another neutral-colored image, and of course, as I love photography, that also meant using a photo I took! I don’t have photoshop, so I chose a photo that left a lot of blank space to the right of the photo.
The text and font choice are crucial to maintaining a professional air to your profile. You will want to choose words that highlight your personality and skills while also ensuring they are minimal enough to stick with someone if they glance at them briefly. I chose to have my name and three important things to highlight about myself. Don’t worry if you don’t have three things to highlight; two or even one would suffice! For the font, I recommend choosing an elegant font for your name (I chose one that made it look like a signature) and a font that’s more professional/minimal for the descriptors.
Additional banner tips:
If you have a logo, put that in the bottom right-hand corner of your banner!
Keep in mind that your profile photo will take up a bit of space on the bottom left, so plan your photo choice accordingly.
5: Headline
Your headline is the first bit of text that appears below the name on your profile. Most people will simply put their job title there, but that’s no fun! I recommend putting the descriptors you used in your banner here, or, if you didn’t want to have descriptors in your banner, now’s the chance to pick some things to showcase. Think about your field and some skills you have that will be useful for a future job. In my case, I chose my first descriptor to be “Future Librarian” as I feel that showcasing my desired profession is important. My other two descriptors highlight skills that I’m proud to have, “Writer” and “Photographer.” I take pride in my writing and photographing abilities, which is why I chose to highlight them rather than picking something like “Leader,” or “Researcher,” which may be more directly applicable to my field. After highlighting those things, I then added my “job title,” Master’s Student and Graduate Assistant at the University at Buffalo. Your headline may look very different from mine; you may choose not to add your job description or add a tagline as some other people do, but I at least recommend having one descriptor in there somewhere!

6: About Section
This is where you get to talk about yourself and highlight your skills and background in more detail. There are all kinds of different suggestions out there for how long this section should be, but I think that you should make the most of the space provided.
To ensure that you are making the most of the space, try to put the most important information towards the top. LinkedIn previews the first three and a few lines of your about section when someone views your profile. In order to see more, they must click the “see more” button. These first few lines are where you should explain your current position, whether that be education or a job, as well as any relevant research you are doing. Next, you should list any relevant organizations you are a part of or committees you are on. After those things, then you should go into more detail about your future goals and aspirations, then what drives you to achieve these goals. Showing people your motivation for your field will prove to them that you would be a dedicated employee and valuable connection.

7: Featured Posts (and Posts in General)
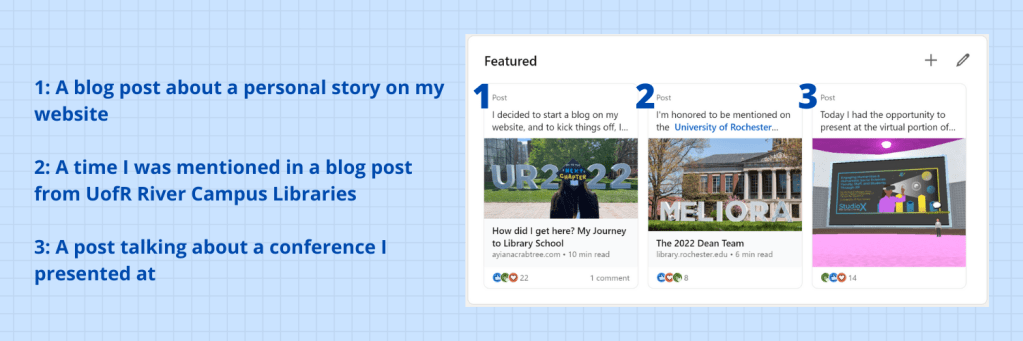
Having featured posts relies on actually posting content, of course, so you should strive to post about any important events in your career, such as starting a new job or at a new degree program, when you present at a conference, if you wrote a blog post, or were interviewed for or mentioned in an article. An important part of posting is adding relevant images where applicable. Images catch people’s attention and draw them to engage with your post for a longer amount of time. Typically when you add a link to a post, the featured image from the article or webpage will appear in the post, which is a great help.
I try to keep my three most relevant posts in the featured tab and will swap them out when something more interesting comes around. Usually, this is a post about the most recent conference I presented at, a time I was featured in/interviewed for a blog post, and one of my blog posts (usually a personal story). This way I can cover a wide range of things and showcase my skills as best as possible!
8: Experience
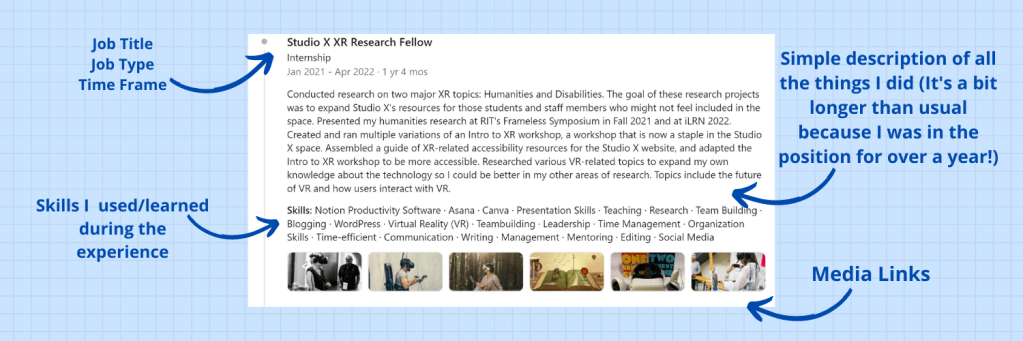
I like to think about the experience section of LinkedIn like a resume but without every single little specific detail. I tried to think of a way to limit the amount of content you post below each entry, but I think it simply depends on how the experience you gained is relevant to the field you are in (or aim to be in). Keeping the content as minimal as possible is ideal though, so people don’t get overwhelmed with a paragraph of text for every position you held!
When it comes to deciding what to add to your experience, I recommend adding everything, as all jobs and internships have their own unique way of teaching different things that have shaped your skills. This is why I included my year of retail experience to my profile because while some people may see it as irrelevant to Librarianship, it taught me valuable customer service skills and how to maintain composure during stressful situations (Black Friday morning shopping rush was certainly a learning experience!)
Some extras to think about: LinkedIn gives you the option of adding relevant skills to your experiences, which is a great way to showcase the exact reasons you added the experience to your profile. This also allows you to cut down on words in your description, as you can add the WordPress skill tag rather than adding an extra sentence to say “I used WordPress.” LinkedIn also lets you add relevant media links directly to the experience, so if you worked on a website, you could add the link so people can see all your hard work in action!
9: Education
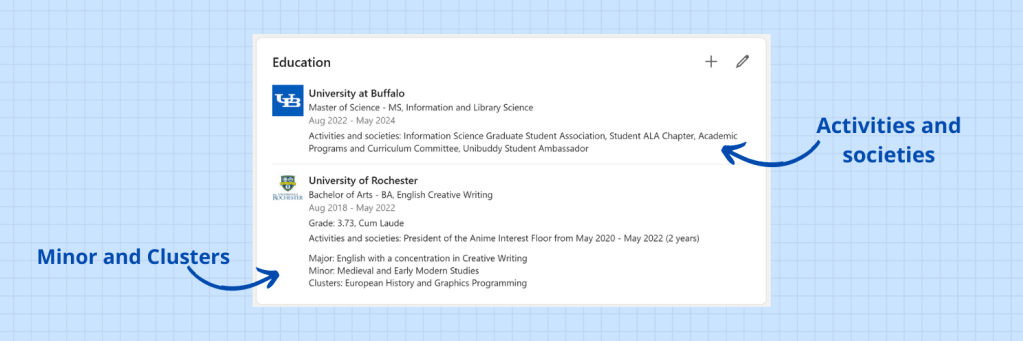
This category is pretty self-explanatory, you add what colleges you went to and the degree programs you completed while there. However, the majority of people don’t take advantage of the Activities and Societies or Description sections. These allow you to describe a little more in detail the extracurriculars you participated in and any minors you may have completed as part of your degree.
10: Skills
The skills section helps to build on all the things that came before it by allowing people to see all the things you’re good at in an easy-to-read list. You can add skills that you’ve gained from areas not mentioned on your profile; perhaps you taught yourself to code or gained writing experience from a personal blog. Any skills you added directly to your experiences will appear on the list too. If you forgot to add something to an experience, you could add that experience directly to the skill from this list as well.
11: Extras
I’ve classified all the remaining categories as “extra” because you may not have anything to add to these sections, or you may simply already have a strong enough profile that you feel they are unnecessary additions. I, however, believe that every section is important, so here’s a little about each of those!
Volunteering
This is the section where you can add classic volunteer work but also things like committees you’re a part of
Publications
This should be semi-self-explanatory, but not only should you put official papers, but you should also include any publicized blog posts, articles, etc. that are posted on sites that are not your own personal website or blog. This way you are able to showcase all your writing expertise. You can also add your co-authors to any publications where applicable.
Courses
This section used to be confusing to me because why would I add all my classes to LinkedIn, but then I realized that this provides a way to showcase any skills you picked up in coursework relevant to your field. For my undergraduate, I didn’t have too many relevant courses, but I’m sure that as I complete my MS-ILS, I’ll have plenty more to add at the end of each semester.
Projects
The projects section should be where you add anything that required extensive research or planning. I wouldn’t add class projects here unless they were an entire semester in the making though. For example, I added the creation of my Introduction to XR Workshop to this section, as it took me more than half a year to assemble the final product and redesign it when new variables popped up. If you add a project, don’t forget to link to your final product as well! Showcase your work as much as you can; that’s what your profile is for.
Honors & Awards
You may not have many honors or awards, but you should take the time to show them off if you have them! This section would also include scholarships you’ve received.
Organizations
This section at the bottom of your LinkedIn profile is where you get to show off your involvement with relevant organizations. I personally don’t add anything I’m a casual member of here, like ASIS&T and the ALA, as I haven’t personally done anything for those groups other than reading their newsletters every now and again, but you get to make that choice for your profile!
Conclusion
If utilized correctly, your LinkedIn profile can be a great resource for fostering professional connections and helping you make a name for yourself in your field. Drawing attention to your strengths and showing off your personality in your profile will only help you in your career journey.
If you’ve made it this far, thanks so much for reading! I really appreciate the time you’ve taken to peruse all the tips and tricks I had to share. I’ve been wanting to talk about LinkedIn tips for a while, and when I started my blog, I realized that this would be the perfect place to do so. If you think you’d like to see some of my longer posts like this in a video format with a screen recording for a more detailed tutorial let me know. I’ve been wondering about making informational YouTube videos like that, but I want to make sure there’s interest first. For your time, here’s a photo of my puppy, Lucy, who sat with me as I wrote!

Leave a comment